3 Challenges for small Spaces: Does your dog understand his cues?
Very few agility athletes have their own course on their doorstep and therefore ideal training conditions. I know this problem very well, as I lived in 25 square meters when I was a university student and the nearest training facility was 30 minutes (dog club) or 60 minutes (dog sports hall) away. However, in my small apartment I had space for 2 folding jumps, which I was able to set up on a public soccer field.
After moving into a house, I had more equipment, but only a very small garden which I was allowed to use. Some of my training took place on a grassy strip 2 meters wide and 8 meters long. With a little creativity, I was able to train despite the less than ideal conditions. Even with little space and equipment, my dogs learned many skills that were extremely useful on the big course.
I would therefore like to share some ideas with you for training in a small space and with just a few pieces of equipment. Many of these exercises test your dog’s understanding of certain jump commands. If you discover a lack of understanding, it is a good idea to make the task easier so that your dog is successful. Gradually, you can then make the exercise more difficult again.
Admittedly, I have ideal training opportunities today. Nevertheless, around two thirds of my own training takes place on 2-3 obstacles and in a small space. Even today I like to work on small details and rarely run long courses.
The Challenges
The green circle symbolizes the reward. This can be a toy or a food reward. A food machine is also suitable. No matter which reward is chosen, the dog should be able to focus on it well and drive to it independently to pick up the reward without needing your help. A clicker can be used for all exercises to audibly mark the dog’s correct decision. Using a focus cue can be helpful to set your dog up for success. You can learn more about how to teach it in this article.
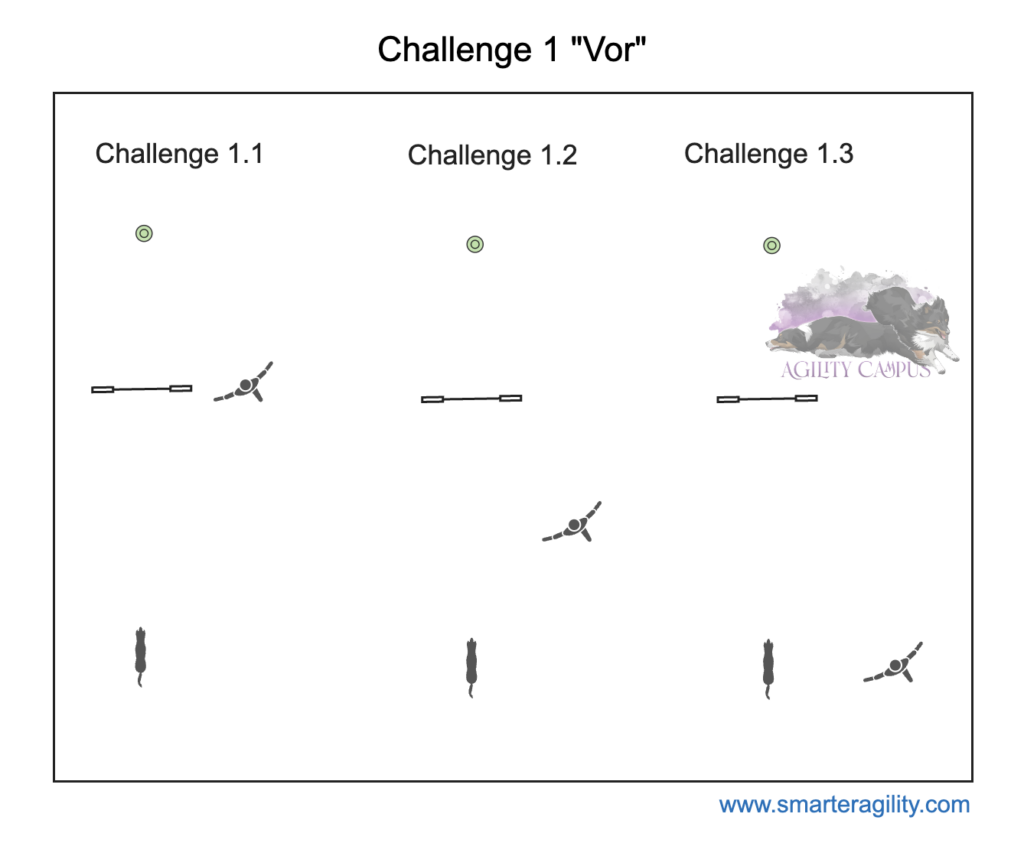
Challenge 1: Go On
This challenge is particularly suitable for young dogs or beginner dogs. But this challenge is also relevant for more experienced dogs or dogs that don’t like to move away from the handler (velcro dogs).
When giving the “forward” command, I want the dog to stretch and jump forward in extension.
In Challenge 1.1, your dog should jump over the jump on the forward-command and take the reward at the green dot. Your position is next to the jump. You do not move with your dog and do not indicate the jump with your body language, because he should learn to take it on the “forward” command alone.
In Challenge 1.2, you gradually change your position so that you are halfway between your dog and the jump. Again, you are trying to send your dog over the jump to the reward purely on the verbal “forward” command.
In Challenge 1.3, your position is now next to the dog. Does your dog also execute the verbal “forward” command from this handler position? Then you can increase the distance between the dog and the jump. Here, the available space determines the maximum distance. If you can send your dog 5-7 meters without running along yourself, you have already laid a good foundation.
Challenge 2: Jump command
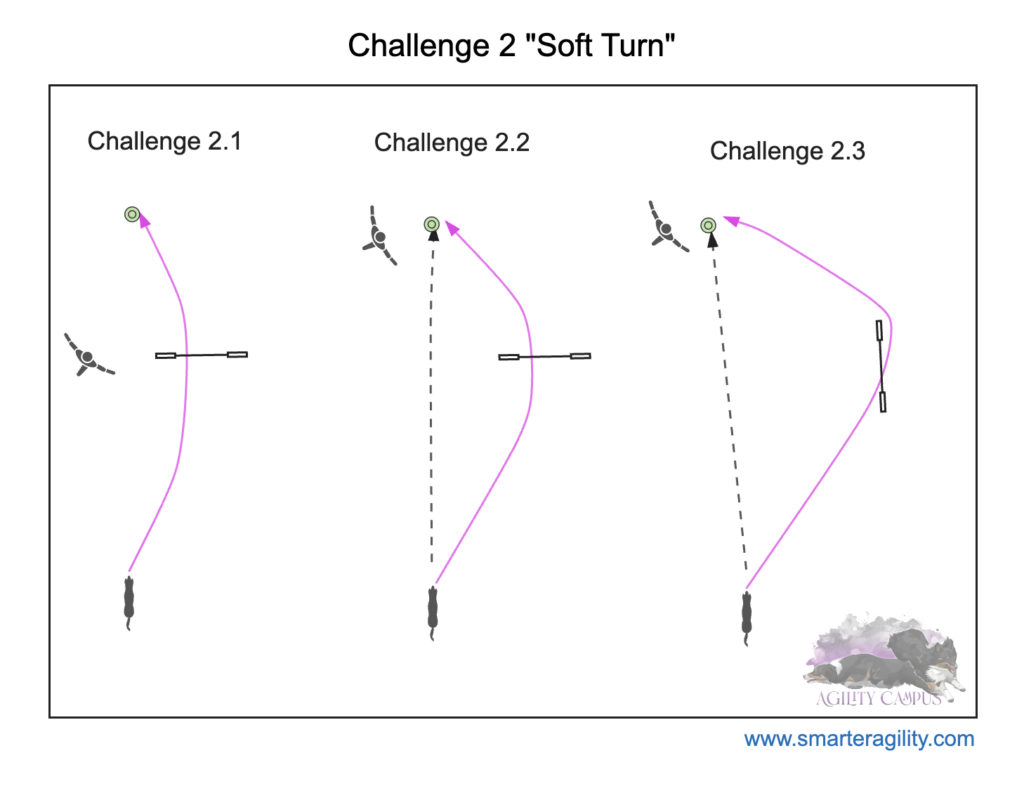
This challenge really benefits all dogs that need to build up a little more equipment focus. A jump command is particularly helpful in start situations where the handler cannot lead out and call the dog directly in a straight line. But also in other course situations where the handler wants to indicate a jump with lateral distance, a general jump command is helpful. When giving the jump command, I expect the dog to take the jump and then orient itself in the direction of the handler.
In Challenge 2.1, your dog sees the reward slightly offset next to the jump. The easy way to the reward would therefore lead past the jump (dotted line). If your dog chooses this route, he will not receive the reward. Your position is to the side of the jump. You only give your verbal command and do not show your dog the jump or approach the jump. Your dog must be able to run past the jump. He should actively and consciously decide to take the jump.
In Challenge 2.2 you keep changing your position and the starting position of your dog until your dog has to run a clear arc to the jump. The further away you are from the obstacle, the easier it is to give the dog a focus command and point to the obstacle before the release. As soon as the dog takes aim at the jump, you can let him start with the jump command.
In Challenge 2.3 you change the angle of the jump. The shallower the arc to the jump is, the more difficult it is for many dogs to focus on it and then jump on the jump command.
Depending on how the dog is sent with the jump command, there may be an overlap with other jump commands (in Challenge 2.2, for example, a “Left” command or in Challenge 2.3 possibly an “In” command). The jump command is therefore not linked to a specific way of taking the jump, but rather serves as a distinction in sequences where differentiation between a jump and another piece of equipment is required or as an aid when handling at a distance.
ATTENTION: For the sake of simplicity, all challenges are only shown on one handling side of the dog. Of course, everything should be trained on the left and right side.
Challenge 3: Inside & outside
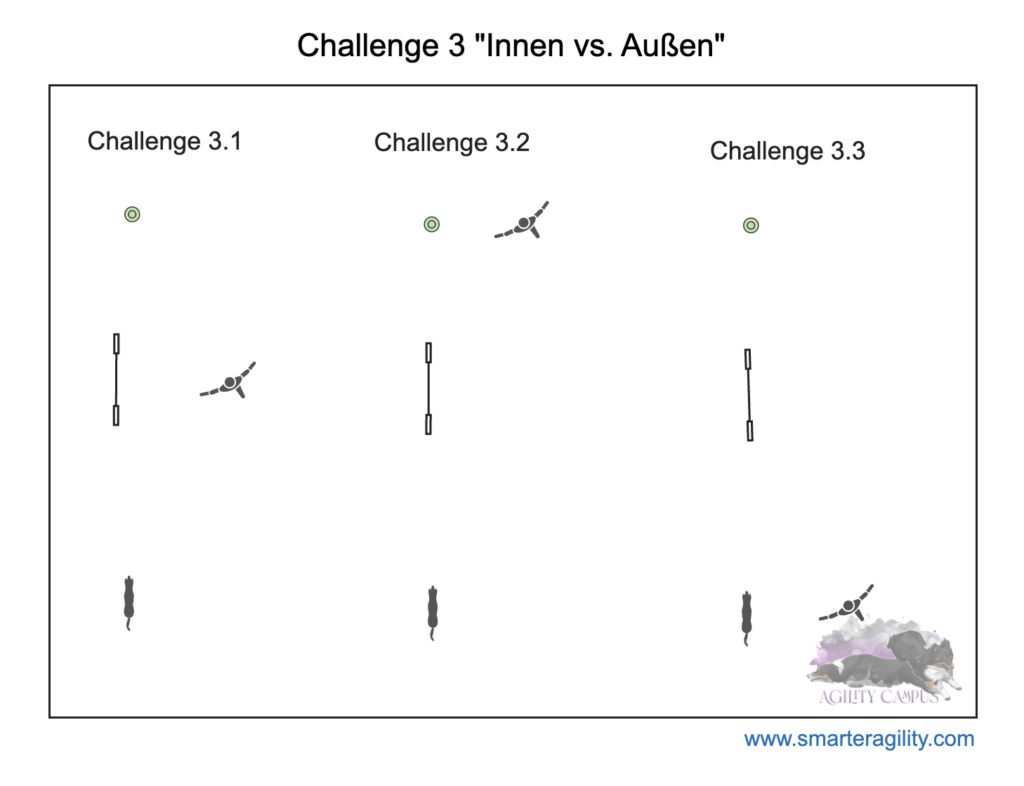
In Challenge 3.2, you are positioning yourself next to the reward. For many dogs, this position is an indicator of the inside command. If your dog finds it difficult to accept the outside command, only gradually change your position from Challenge 3.1 until you have reached the handler position of Challenge 3.2.
In Challenge 3.3 you are standing next to the dog. The placed reward alone now draws the dog forward. From this position, you can hardly give any body language cues, even unconsciously, and your dog is on his own at the jump. This will teach him to accept the inside or outside command independently. If your dog has problems here, start next to the jump again and move your position a little further back with each repetition until you are standing next to your dog.
Did you know?
Exercises like these not only promote your dog’s understanding of his jump commands, but also demand a lot of mental capacity. It is therefore advisable to keep the sessions very short, 2-3 minutes per session are often completely sufficient. It’s better to train a little more often, but briefly and effectively. Remember to keep a balance between thought exercises (like these challenges) and drive exercises so your dog doesn’t lose motivation. Mehr darüber erfährst du in diesem Artikel.
Also make sure that you don’t make the exercises too difficult. With these static brainteasers, your dog may quickly become frustrated if he is making too many mistakes. Therefore, reward successes generously and break up the session with play breaks. If you get stuck, take a few steps back and make it easy for your dog to succeed.
These challenges can also be practiced at a lower jumping height, as it is not your dog’s physical fitness that is important here, but rather listening and understanding the commands. If you let your dog jump at a lower height, the strain on his body is reduced and your dog will not tire as quickly.
Fancy more?

